Years ago I replaced the engine compartment fuel lines (in a parking lot in Wyoming with only the tools with me, but I digress).
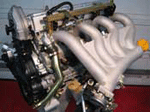
For years I've wanted to replace my fuel filter, because I've owned the car since 1999 and I've never replaced the fuel filter. I've had one in my box of "Porsche Parts and Stuff" for maybe 10 years now. The "aspirational" fuel filter. I bought an "aspirational" in-tank fuel strainer last summer when I needed more parts to qualify for free shipping.
Any time I looked at the crusty fuel filter on the car and the aged lines attached to it, I just knew it wouldn't be a simple remove/replace. So I put if off.
Until a few days ago, that is.
I drove the car until the "Reserve" light came on. Jacked up the right side. Removed the access panel on the fuel pump mounting plate. Drained the remaining gas into a gas can by removing the fuel line under the access panel. Got to work.
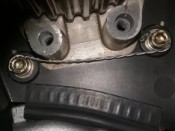
With the help of a little WD-40, I was able to separate one single connector, the end of the post-filter soft line where it meets the body hard line. Fortuitous for me, this is the only one that needs to be disconnected in order to get the rest of it all off the car. Well, that and the two 10mm nuts that hold the filter bracket to the chassis. Well, that and the 13mm bolt that holds the strap to the chassis.
Conveniently, the rubber fuel lines were stamped "12 86", which might mean the 12th week of 1986, or maybe December 1986. My car is a 1987 model year, so that tracks. Regardless, they are quite old.
Here they are on the workbench, complete with decades of crud.
The soft line connections at both ends of the fuel filter and at the fuel pump were incredibly tight. I mounted the filter in the bench vise in order to get enough counter-hold force to knock the fittings loose. I was able to use a 19mm socket on a long ratchet to break the pump-end of that soft line free. When reinstalling, go normal-human tight instead.
Of course, the strap was pretty rusty and its "gasket" material, as well as the gasket material around the perimeter of the mounting plate and access panel, were compromised. So I wire brushed the strap at the bench grinder, cleaned, primed, and painted. Then I applied a strip of 1/16" neoprene rubber from a roll I had laying around from another project (not pictured because I must not have taken a pic, and it's already on the car now).
Tank-Side Fuel Lines
- usury
- Posts: 214
- Joined: Thu Sep 15, 2022 1:18 pm
- Location: Seattle, WA
- Has thanked: 97 times
- Been thanked: 93 times
Last edited by usury on Sun Aug 06, 2023 9:19 pm, edited 4 times in total.
Freelance New Age Renaissance Man
and Wrench Warrior
1987 944na with S2/Turbo facelift
Seattle, Washington, USA
and Wrench Warrior
1987 944na with S2/Turbo facelift
Seattle, Washington, USA
- usury
- Posts: 214
- Joined: Thu Sep 15, 2022 1:18 pm
- Location: Seattle, WA
- Has thanked: 97 times
- Been thanked: 93 times
I also cleaned up the mounting plate and access plate and applied new strips of 1/16" neoprene rubber to those.
Rather than try to use AN fittings and buy lots of pretty anodized pieces and special tools, I dismantled the old lines to reuse the fittings. A careful hand, a Dremel tool, and your favorite blunt screw driver for prying combine to make quick work of the compression sleeve. Just don't cut too deep and you'll be fine. (Here I had already cleaned up the fittings on the wire wheel at the bench grinder.)
What I didn't expect was two different sizes of rubber lines.
Of course, I had only ordered the 10mm stuff (pressure rated to 300psi, which is probably overkill, but hey). My friendly local auto parts store didn't stock both sizes in pressure rated. Amazon does, though, as well as the nice "fuel injection" stainless clamps (in different sizes, too, of course). For the clamps, it's probably best to get a "kit" with an assortment of sizes. The bigger clamp is for 16-18mm, the smaller one is for 13-15mm (these hoses are 17mm OD and 14mm OD respectively).
Since I needed to wait for the smaller diameter hose and corresponding clamps, I started by mounting the filter and the rebuilt 10mm line to the car. You can see the "fuel injection" clamps on the new line (though not in focus, sorry, best I've got) as well as the new filter. I put a piece of green masking tape with the date/miles on the filter, covering that masking tape with a piece of clear packaging tape for longevity. That way I'll know just how long I've ignored this filter when future me looks at it.
Rather than try to use AN fittings and buy lots of pretty anodized pieces and special tools, I dismantled the old lines to reuse the fittings. A careful hand, a Dremel tool, and your favorite blunt screw driver for prying combine to make quick work of the compression sleeve. Just don't cut too deep and you'll be fine. (Here I had already cleaned up the fittings on the wire wheel at the bench grinder.)
What I didn't expect was two different sizes of rubber lines.
- Pump-to-filter hose (the shorter one) is 8mm ID (5/16")
- Filter-to-hardline hose (the longer one) is 10mm ID (3/8")
Of course, I had only ordered the 10mm stuff (pressure rated to 300psi, which is probably overkill, but hey). My friendly local auto parts store didn't stock both sizes in pressure rated. Amazon does, though, as well as the nice "fuel injection" stainless clamps (in different sizes, too, of course). For the clamps, it's probably best to get a "kit" with an assortment of sizes. The bigger clamp is for 16-18mm, the smaller one is for 13-15mm (these hoses are 17mm OD and 14mm OD respectively).
Since I needed to wait for the smaller diameter hose and corresponding clamps, I started by mounting the filter and the rebuilt 10mm line to the car. You can see the "fuel injection" clamps on the new line (though not in focus, sorry, best I've got) as well as the new filter. I put a piece of green masking tape with the date/miles on the filter, covering that masking tape with a piece of clear packaging tape for longevity. That way I'll know just how long I've ignored this filter when future me looks at it.
Last edited by usury on Sun Aug 06, 2023 9:25 pm, edited 4 times in total.
Freelance New Age Renaissance Man
and Wrench Warrior
1987 944na with S2/Turbo facelift
Seattle, Washington, USA
and Wrench Warrior
1987 944na with S2/Turbo facelift
Seattle, Washington, USA
- Tom
- Site Admin
- Posts: 8810
- Joined: Fri Jun 25, 2021 2:04 pm
- Location: Silicon Valley, CA
- Has thanked: 913 times
- Been thanked: 3901 times
- Contact:
Nice job and write-up! I'd say you got all of your money's worth out of those lines.

- usury
- Posts: 214
- Joined: Thu Sep 15, 2022 1:18 pm
- Location: Seattle, WA
- Has thanked: 97 times
- Been thanked: 93 times
When the smaller diameter fuel hose arrived, and the corresponding clamps, I rebuilt the shorter line. Keep the protective rubber hose around the rubber fuel line to help prevent chafing against the metal mounting plate.
Before re-installing on the car, I also replaced the in-tank strainer. The old one was in there da*n tight. I'm guessing it was original to the car. I slowly rocked it out using a 17mm deep-well socket on my battery-powered pretty wimpy impact gun. I imagine a person could rip the aluminum bung it threads into right out of the plastic gas tank. So don't use your mighty air impact and don't just "send it" with whatever tool.
My old in-tank strainer was still intact. I was surprised. Furthermore, there was no gunk or goo or funk or crud or yuck at the bottom of the tank either. I was pleasantly surprised.
Then I installed the pump assembly onto the bottom of the gas tank. I didn't take pictures while in progress - it's a little fussy to get everything to line up properly. The fitting at the filter-end of the short hose must be rotated the correct amount to engage properly with the fuel filter prior to tightening the corresponding hose clamp. These clamps have a 7mm drive nut, so I used a socket driver to clamp them tightly.
After connecting all the fuel lines and tightening all the clamps and fittings (17mm & 19mm open-end wrenches are needed), it's time to put some fuel into the tank and power up the pump.
The easy way to power up the pump is with a DME relay bypass wire. You don't even need the key in the ignition. The "30" terminal is constant B+, 87b is the fuel pump, and 87 is the DME. You only need the fuel pump, but I didn't want to leave a live wire flappin' around under the hood. So, here I connect my white wires to 87b and 87 (conveniently marked with a white paint pen), then I connect 30 (marked with red, since apparently I didn't have a yellow pen to match my home-made jumper wires).
It took about 30 seconds for the pump to quiet down. My loving girlfriend checked for leaks at the back of the car while keeping the neighbor's puppy away from non-edible shop rags and tools.
All buttoned up.
Last edited by usury on Sun Aug 06, 2023 6:11 pm, edited 1 time in total.
Freelance New Age Renaissance Man
and Wrench Warrior
1987 944na with S2/Turbo facelift
Seattle, Washington, USA
and Wrench Warrior
1987 944na with S2/Turbo facelift
Seattle, Washington, USA
- usury
- Posts: 214
- Joined: Thu Sep 15, 2022 1:18 pm
- Location: Seattle, WA
- Has thanked: 97 times
- Been thanked: 93 times
It is wise to protect the wire-brushed soft-line fittings with paint. They won't last long at all if left raw. I clean them with acetone, then wax and grease remover. I used rattle can self-etching primer and a nice color I already owned - satin nickle metalic.
Freelance New Age Renaissance Man
and Wrench Warrior
1987 944na with S2/Turbo facelift
Seattle, Washington, USA
and Wrench Warrior
1987 944na with S2/Turbo facelift
Seattle, Washington, USA
- blueline
- Moderator
- Posts: 6060
- Joined: Mon Sep 26, 2022 12:22 pm
- Location: Middle Tennessee
- Has thanked: 4406 times
- Been thanked: 2395 times
Someone (or many someones) will appreciate your detailed work on this. Nicely done!
Tim
Current:
'26 911 Carrera S - PTS Verde British Racing Green
'24 Cayenne S - Algarve Blue Metallic
'21 718 Cayman GTS - Black
'22 911 Turbo S - Carmine Red
'21 718 Cayman GT4 - White
'11 GMC 1500 Quad Cab 4x4 - Black
Musik-Stadt Region
Current:
'26 911 Carrera S - PTS Verde British Racing Green
'24 Cayenne S - Algarve Blue Metallic
'21 718 Cayman GTS - Black
'22 911 Turbo S - Carmine Red
'21 718 Cayman GT4 - White
'11 GMC 1500 Quad Cab 4x4 - Black
Musik-Stadt Region
- usury
- Posts: 214
- Joined: Thu Sep 15, 2022 1:18 pm
- Location: Seattle, WA
- Has thanked: 97 times
- Been thanked: 93 times
So far so good. However, if I were to do it over again I think I'd use crimp style clamps, like these...
Glarks 120Pcs 7-21mm 304 Stainless Steel Single Ear Hose Clamps Assortment Kit
https://a.co/d/a6u78Df
Freelance New Age Renaissance Man
and Wrench Warrior
1987 944na with S2/Turbo facelift
Seattle, Washington, USA
and Wrench Warrior
1987 944na with S2/Turbo facelift
Seattle, Washington, USA
-
Zirconocene
- Posts: 191
- Joined: Mon Apr 04, 2022 4:59 pm
- Location: PDX Adjacent
- Has thanked: 78 times
- Been thanked: 48 times
Really nice work, as always.
A couple of things that come to mind, if you contemplate future work on the system.
A#1: Sidewinder hoses. They come pre-formed in a variety of radii, so that you can cut out the part that you need. Example, in 1/2" line: https://www.retromotioninnovations.com/ ... 5925838951
B#2: If you ever run into an issue with the aluminum bit on the fuel tank starting to break free and turn and generally be non-functional, there is a product developed for the 928 (sold at 928sRUs) that fixes the issue for those cars. It might also work for these cars.
I know that you didn't have to look into fixing that, but others might run into the issue, and need to know about the option.
Cheers
Cheers
1990 928 GT
1990 928 S4
1991 944 S2
1993 968
2002 911 C2
1990 928 GT
1990 928 S4
1991 944 S2
1993 968
2002 911 C2
- icb
- Posts: 150
- Joined: Mon Aug 07, 2023 9:09 am
- Location: Dayton, Ohio
- Has thanked: 59 times
- Been thanked: 54 times
- Contact:
Nice work, and a great write up! I recently did the same job. Your old fuel lines looked brand new compared to what I had to deal with. Every time I get under my car I loudly curse the original owner who drove my car through the Illinois winters for who knows how many years. Sorry for the lousy focus.
